Reconstruction of the Citizen's costume
part 2: the making
The Citizen
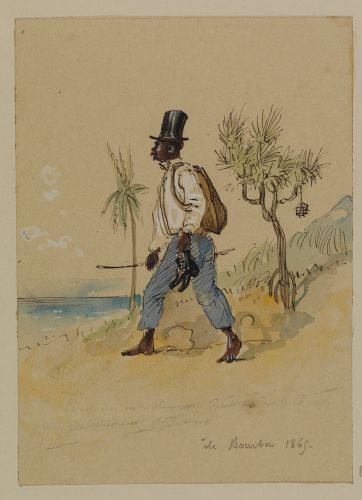
The watercolour opposite is the first reconstruction project that we have chosen for our project.
We invite you to read the description of this one in the article A citizen of 1848 as well as the preliminary research in the article Reconstitution of the Citizen's costume - 1rst part : the research
In this article, I will discuss the different stages of the "production" of this man's clothing. This includes :
- the selection of the fabric,
- by its dyeing,
- the pattern making (design)
- and finally the making of the garment.
Although this is quite specific work, I will try to make it as understandable as possible for the uninitiated, and hope that it will generate interest in this exciting field of sewing.

The fabrics
In the article Reconstitution of the Citizen's costume - 1rst part : the research it had been approached that the shirt would be in cotton batiste, and the trousers in cotton canvas. Terms certainly a little "barbaric" but which indicate the type of weaving and thus the rendering of the fabric (in term of fall, transparency, solidity, etc)
The pair of trousers

I opted for Calico (Calico is a coarse cotton fabric woven in plain weave [...] In sewing, because of its coarseness, its low cost and its good hold, it can be used to make patterns).
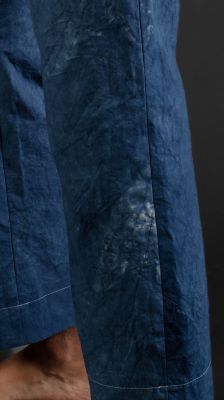
Indeed, after ordering blue cotton from Les Coupons de Saint-Pierre (more specifically, cotton cretonne and cotton gabardine) I found that the weft was too regular and too sophisticated. It would have made the work particularly smooth and textureless, similar to the texture rendered by watercolour.
Unfortunately I have never had any workers' clothing from this period in my hands, but I imagine that the weave was not perfect at that time, especially if it was intended for workers. The calico has irregularities and the weft is clearly visible, but not fragile, giving it a rough and worn appearance.
The shirt

Having taken advantage of the fabric order at Les Coupons de Saint-Pierre, I took the opportunity to get white cottons for the shirt.
The available batistes were neither white nor plain, so I fell back on a cotton poplin coupon from the Haute Couture category. Poplin is very pleasant to work with and to wear, and is just as suitable for making shirts as the batiste that was in demand during the search.
Les Coupons de Saint-Pierre are mentioned, but we are not sponsored by this shop.
The choice was (for me) naturally made on this e-shop because the operation of buying 3 meters coupons at low prices is financially interesting. Especially since the clothes produced are still prototypes!
If you wanted to find the same fabrics, I regret to inform you that their stock changes constantly according to the arrivals of destocking.
The dye
The shirt had to remain white, but the trousers had to be dark blue. You could see in the previous section that the calico was unbleached: it had to be dyed.
After several unsuccessful attempts (...) to dye with indigo, I decided to use an industrial dye. I still hope to be able to use natural indigo dye for the next reconstructions, or even to be able to find cotton fabrics already dyed with indigo.

Nothing in particular, except that I recommend that you make sure that ALL the fabric is well moistened before starting the dyeing, at the risk of having a similar result to mine...

The patterns
Before moving on to the making of the garment, it is necessary to go through the "pattern-making" stage with a pattern. This can be created by the stylist or bought in a fashion house.
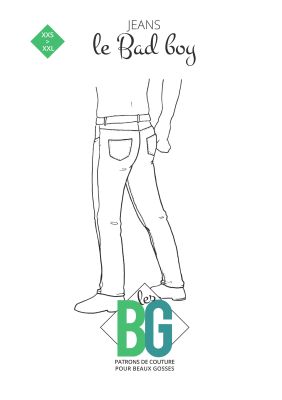
Unfortunately, I am not specialised in pattern making, and always use ready-made patterns, which I can slightly modify as needed. So I took patterns from two different houses for this reconstruction.
There was one on Etsy that matched what I wanted to do for the shirt: this shirt pattern was bought from Black Snail Patterns, sent and...still hasn't arrived...which led me to improvise this step to finish the clothes in time for the shoot.
Fortunately, in my personal collection, I already have patterns for men!
I should point out that our project is not sponsored by BG or by Make my Lemonade. But having tested them, and having them on hand, it seemed easier to use them.
The shirt

Shirt's pattern
Modern shirt pattern, already approved by myvgentleman who proudly wears his beautiful custom made shirts
The modern shirt as we know it has been progressively shaped by the needs and demands of the people who wear them. This means that the shirt in this pattern has to be modified:
-
The shape
Measuring 1cm from under the armpits (to keep the right angle of the pattern already drawn. This may seem superfluous to the uninitiated, but I assure you it's really important) I traced the underarm seams in a straight line to the bottom hem.
Indeed, "curved" shirts (with a more pronounced waist) are modern inventions; our 19th century shirt has very few curves.
The bottom hem has been changed to a straight line, instead of a curve that runs up to the hips. Nothing too fancy so far
-
The placket
As seen in the article Reconstitution of the Citizen's costume - 1rst part : the research, the placket did not go all the way down before the patent was filed in 1871. It was therefore necessary to stop it at the level of the belly. Fortunately, one of my favourite shirts in my patterns has this characteristic:

Although this is a women's pattern, the desired element was the so-called "polo placket" (link in French but with easy to understand pictures) in this pattern. Although the name is different, the principle remains the same as that needed to make this shirt. A fusion of these elements was carried out without too many problems:

I'll skip the technical details, but basically
- I removed the button placket from the BG men's shirt pattern
- I put the polo placket of my Wear My Lemonade women's shirt on it
- taking care to match the collar line
- and above all by adding fabric under the placket so that the fabric is cut on the fold and therefore has no seam on the front (the two parallel lines at the bottom of the polo placket)
When I say "on the fold", it means that the fabric is folded so that the fabric is not cut, like this:

Where the fabric is folded, the pattern is held by small coloured clips. This only works on symmetrical pieces.
Unfortunately, adding this polo placket changed the length of the collar stand...
-
The yoke
But why am I talking about yoke when there is none in 19th century shirts? Because I had to remove it from my modern shirt pattern...! You can see it on the pattern preview, in the little circle showing the back: a fold and a seam; the seam represents a back yoke, and the fold is what is called a "box pleat" to cross the arms more easily.
"Easy" you may think. Well...yes, it's still okay.

By shifting the back (cut on the fold of course, so that I don't have a seam in the middle of the back) I superimposed the back on the yoke in question (yellow line) and obtained a single piece.
But...but...a 0,5cm gap was visible (top left), so I have to add this 0,5cm to the collar foot...I thought it was too easy
-
The neck stand
The collar stand is the part that goes up the neck and supports the collar (which usually falls down). When you wear what is called a "Mandarin collar" it is just a collar stand after all.
Modifications made :
- the yoke modification had added 0.5cm, so 1cm in total since the fabric is cut on the fold.
I wrote 0,5cm but it's really 1cm that is added.

And if this little measurement seems ridiculous, it is not when it comes to matching two lengths of fabric where 1cm is missing. I only modified it at the bottom, because I didn't want to modify the size of the collar as well...might as well simplify life sometimes :)
- the addition of the polo placket had changed the length of the collar base. I had to enlarge it by adding 1cm on each side of the collar

A little surgery later, the collar has the right size, and matches the neckline of the shirt. An excellent thing done!
The pair of trousers

Like the shirt, this denim pattern is a modern and sophisticated shape thanks to the addition of details, which are not necessary for our historical reconstruction
-
Non modified parts
As an amateur pattern maker, I don't touch certain parts for fear of not being able to control the final result. This is the case with the crotch of the trousers.
The crotch is the part where the 4 pieces of the trousers come together. So that's where our crotch is, and what could be more unpleasant than having a badly cut crotch?
So I kept the crotch of the pattern as well as the whole of the buttocks and front as it is.
-
The pockets
Indeed, on the pattern you can see that the pocket on the front is lower than the belt. This is a sophisticated layering of different layers which gives a nice effect but, as seen in the article Reconstitution of the Citizen's costume - 1rst part : the research, there is no pocket. It is therefore necessary to erase this part.
Nothing could be easier:
- by shifting the front
- by transferring the pocket
- by taping the pocket where it should be sewn

Hop! The waist and the side seam match.
I could have drawn the line directly but I preferred to reconstruct this part with the elements present in the pattern.
-
The legs
If on the BG pattern, we see that the legs are designed to be tapered, this does not correspond to our need.
So we simply drew a line from the knee to the ankle at right angles to the bottom hemline

This added the equivalent of 2 to 3 cm to the ankles, giving it a more rudimentary look
-
The waist
To make sure that the fork was low enough for our mannequin, and to be able to make a fabric strap to tighten the trousers, I added 10cm to the waist. Unfortunately I didn't take a photo of this modification.
But having added enough fabric allowed me to add a rudimentary fastening system to the trousers: a gimp with a buttonhole to pass the cord through

If the shirt had a lot of parts to put together, the trousers were more "basic" and therefore easier.
I'm not saying that trousers are easy to sew, so look at the pattern and all the parts needed to construct the garment (and the need for a large table!):

Are you lost looking at the unfolded pattern? Then let's take a look at what I needed to make these trousers:

No need for pockets, belts or hidden zips. All these details add complexity, but also practicality and comfort. Our simple trousers go to the essentials: a front leg, and a back leg
All these modifications may seem insignificant, but when the pieces are the same size and there is no need to "cheat" by sewing the pieces together, it is more pleasant and above all: the result is more professional.
With these changes made, it's time to cut that beautiful white poplin and dyed calico.
The cutting and the sewing
If the stages of pattern modification are interesting, those of cutting and sewing the clothes are less so because they are rather "banal". Perhaps a timelapse would be made on a future reconstruction.
I think it is relevant to specify the time on each garment, in order to quantify the work done (pattern, modifications, cutting and sewing):
- the trousers took a day to make
- the shirt took just over two days to make
And this is without the modifications made on the day of the shoot
To be continued...
This article is part of a three-part series about A citizen of 1848. You have read part 2 about the making of his clothes.
The shooting with the final result will be finished soon, and I will write a 3rd and last article about it.
I hope that the explanations were not too complex, and that even if you are not a sewing enthusiast, this will have piqued your curiosity, and taught you more about this laborious, yet so important, work of pattern making!
Please feel free to share your thoughts and tips via our Contact Us page or on our Facebook page. I would love to share about the story of course, but also about sewing and pattern making, as I still have a lot to learn as an amateur.
In the meantime, I'll leave you with a little ASMR video of scissors cutting the cotton canvas. I really like the sound of it, it reminds me of when my grandmother used to sew for us :)


